
7
 Read More
How to Navigate Easily in Gmail using Mouse Gestures
Well, I think we all are aware about the No. 1 Email Service Provider over the Internet i.e. Gmail. And the thing that makes Gmail No. 1 Email Service Provider is it's User friendly Interface and of course, the hit thing is it's Features that it provides. But this features are disabled in our Account, So that our account may not become bulky and slow. As such, we always love Gmail as we can activate several features in it of our choice from Gmail Labs.


As we talked about features right now, I recently came across a another feature provided by Gmail known as Mouse Gesture. This feature is quite beneficial if we use it in our account. If you do not feel like clicking on the navigational buttons to move from one page to the other, then Mouse Gesture Comes to Rescue. It is time saving as well as it makes navigation in your Email Account easier and quicker. In short, We can Navigate Easily in Gmail using Mouse Gestures.
How to Navigate Easily in Gmail using Mouse Gestures
- Navigate to Mail Settings by Clicking on the Gears and then Settings button present at the Top Right Corner.
- Now go to Labs.

- In the Search Box, Type Mouse Gesture and Enable it. Click on Save Changes.
Now to make use of this feature. Go to your Gmail Inbox. Hold Right Click on your Mouse and move it towards the right direction to navigate to the next page. Now to return the previous page using Mouse Gestures, Hold the Right Click and move your mouse towards the left direction.
That's it for now.
Hope you found this article informative.
Do share your views via comments on "How to Navigate Easily in Gmail using Mouse Gestures"!!!
Do share your views via comments on "How to Navigate Easily in Gmail using Mouse Gestures"!!!
Read More
7
Read More
How to Undo a Sent Mail in Gmail
One of the major disadvantage of sending Emails is that we cannot undo Email once sent. But it's now 21'st generation and every thing is possible as Gmail, No.1 Email Service Provider and my favorite one has introduced a feature which allows us to undo sent mails. Yes, you heard it right. W can even undo sent mails. As I say as always that Gmail has various features to our account in it but they are disabled so that our Gmail Account may not become bulky and slow. So, as Gmail introduces this feature, we should utilize and enable it in our account.
Also Read: How to Insert Picture in Gmail


Also Read: How to Insert Picture in Gmail

Now some of you might be thinking that why is it advantageous or beneficial to add this feature. Let me explain you with my personal example. Recently I had to send an Email to my friend with some text in the Email Body and had to attach a file with it. By mistake, I typed the required text and forgot to attach the file. At the same time, I said , "Oh man, Come on!! I forgot to attach the file!!" And then I need to send another mail to my friend and say - Sorry, I forgot to attach the file and the file is attached with this mail!!" So, it's just like quite awkward when you make such mistakes and this is where Undo Send feature comes to rescue.
Though this is very beneficial but still it can also be helpful in various situations like you hit some wrong words in the Email or you sent the mail accidently to any other person and various other situations.
How to Undo a Sent Mail in Gmail
- Login into your Gmail Account.
- Now Navigate to your Account Settings by clicking on the Gears button present at the Top right Corner and then Settings.
- Click on Labs button present in the Settings Menu.
- Now you will be able to see a search bar. Just type Undo send in it. The result will appear in the form of a small plugin feature and you have to just enable this feature by clicking on Enable and hit Save Changes.
- Now, that's it. You have enabled this feature in your Gmail account. If you wish to check it once then just Compose, Send and check it. Just compose any mail, hit on sent and you will be able to see an option saying Undo. And that's all. You just need to hit on Undo button if you wish to cancel that mail.
So, hope you enjoyed this article and do not forget to like it and share with your friends!
Do share your views via comments on "How to Undo a Sent Mail in Gmail!!"
Read More
1
Read More
How to Insert Picture in Gmail
Gmail is no.1 Email Services provider and everyone loves it as it comes with various handy and awesome features. Although these features are not added to our Accounts by default so as to avoid that our account does not becomes slower and heavy. Earlier Gmail does not provided the option to inset images in the Email body and we used the Attach a file option to attach images. However, now we can enable this function in our account easily which allows us to Insert Images in the Email body.


How to Insert Pictures in Gmail
- Make sure you are logged into your Gmail account.
- Click on the Gears button present at the top right corner and click on Mail Settings.
- Now click on Labs.

- Search for Inserting Images. Enable this function. Click on Save Changes.
You are done with enabling this feature to Insert Pictures in Gmail. Now go to the Compose Mail section. You will be see a change in the toolbar that you can see a picture icon is visible which allows you to insert images in the message body.

So, Hope you find this article helpful!
Waiting for your views via comments on "How to Insert Pictures in Gmail"!!!
Waiting for your views via comments on "How to Insert Pictures in Gmail"!!!
Read More
2
 Are you unable to send files more than 25MB in file attachments in your mail in Gmail?. Don't worry, now there is a trick to send files larger than 25MB files in Gmail. Before this trick I think you were depending on file hosting services like MegaUpload.com, Mediafire.com to transfer your large files on Internet. Now sharing files on internet has become easy. Now you can share very large files up to 1GB in email for free. You can share music, videos, movies, software, photo albums etc up to 1GB through email. Even in these modern days you still can't rely on those file hosting services to send your larger files on internet.
Google's email service provider i.e., Gmail and other email service providers are restricting their users by enabling a limitation to the users email accounts that an user can send a maximum of 25MB files in their emails. If you try to send a file larger than 25MB it will give you an error saying "The file exceeds 25MB attachment limit. Sorry".
 So, email users used to send larger files more than 25MB through torrents or by uploading on file hosting services servers and by sharing that URL with the recipient (to whom the file needs to be sent). Then the recipient needs to download those large files from the file hosting servers. The main drawback of using this service is that the sender needs to register with that file hosting service website. Otherwise the email sender used to cut these files into smaller partitions lesser than 25MB and send these files in multiple emails to the recipient. However it will cause problem to both sender and recipient because the sender needs to cut the file into multiple parts and the recipient needs to rejoin these multiple parts into a single file and use. It looks bit horrible but it can't be done by all. In these modern days you can't rely on that old process to send and share your larger files. Here are some steps used to skip verification process during the sign up of Google account. Now you can use this advanced method to send your large files and documents online in email and instant messaging.
There is a application called "Pando" which helps you in sending and sharing larger files via email. Its helps you in overcoming the defect of uploading larger files and helps you to maintain your privacy from the third party websites. Pando application supports the following operating systems Windows 7, Windows Vista, Windows XP, Mac O S X 10.4 or later. It is a free application as well as paid. In free service you can send up to 1GB file in email and if you upgrade to pro you can send up to 3GB.
Benefits of having Pro account:
Steps to send larger files up to 3GB in file attachments in Gmail:
1. Download and install a free Pando application to your Windows and Mac operating system.[Link].
2. Run the Pando application and now select 'Share new' and select 'email'.
3. In 'to:' mention the recipient email address and now browse the files and folders you want to send to the recipient and fill out the 'Subject', 'Message' and 'From' (the sender's email ID).
4. Click on send to send your mail.
5. The application not only supports Gmail email service but it also supports the other famous email providers like Yahoo! mail, Hotmail and instant messaging services like AOL, Skype, Yahoo Messenger, Outlook and lots more.
6. For using this free service you don't need to register the account on their website.
Snapshot of uploading heavy files.

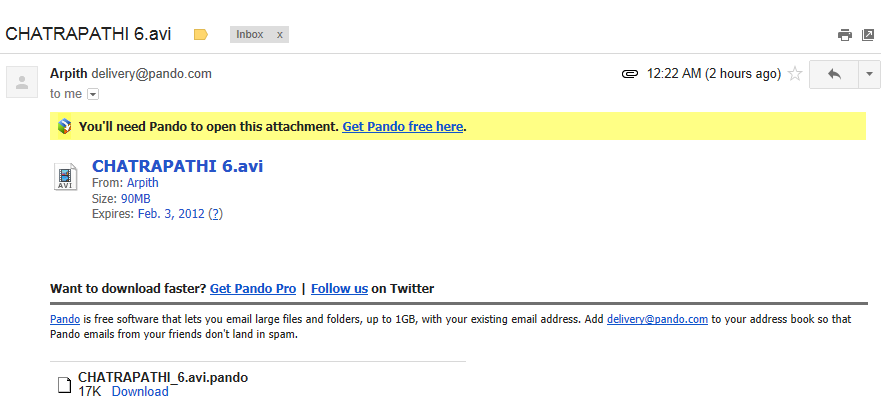
Snapshot of downloading heavy files.

To use the service even the recipient needs to install this application in his computer. You don't need to worry how to tell the recipient to install this application in his computer the software itself tells to the recipient in your sent email.
 [Click on the images to enlarge].
Share it with your friends and start sending emails with file attachments more than 25MB in Gmail.
Read More
How to send larger than 25MB file attachments in Gmail
Are you unable to send files more than 25MB in file attachments in your mail in Gmail?. Don't worry, now there is a trick to send files larger than 25MB files in Gmail. Before this trick I think you were depending on file hosting services like MegaUpload.com, Mediafire.com to transfer your large files on Internet. Now sharing files on internet has become easy. Now you can share very large files up to 1GB in email for free. You can share music, videos, movies, software, photo albums etc up to 1GB through email. Even in these modern days you still can't rely on those file hosting services to send your larger files on internet.Google's email service provider i.e., Gmail and other email service providers are restricting their users by enabling a limitation to the users email accounts that an user can send a maximum of 25MB files in their emails. If you try to send a file larger than 25MB it will give you an error saying "The file exceeds 25MB attachment limit. Sorry".

There is a application called "Pando" which helps you in sending and sharing larger files via email. Its helps you in overcoming the defect of uploading larger files and helps you to maintain your privacy from the third party websites. Pando application supports the following operating systems Windows 7, Windows Vista, Windows XP, Mac O S X 10.4 or later. It is a free application as well as paid. In free service you can send up to 1GB file in email and if you upgrade to pro you can send up to 3GB.
Benefits of having Pro account:
- Share bigger files up to 3GB files.
- You won't be disturbed by their irritating advertisements.
- You can secure your files by adding passwords.
Steps to send larger files up to 3GB in file attachments in Gmail:
1. Download and install a free Pando application to your Windows and Mac operating system.[Link].
2. Run the Pando application and now select 'Share new' and select 'email'.
3. In 'to:' mention the recipient email address and now browse the files and folders you want to send to the recipient and fill out the 'Subject', 'Message' and 'From' (the sender's email ID).
4. Click on send to send your mail.
5. The application not only supports Gmail email service but it also supports the other famous email providers like Yahoo! mail, Hotmail and instant messaging services like AOL, Skype, Yahoo Messenger, Outlook and lots more.
6. For using this free service you don't need to register the account on their website.
Snapshot of uploading heavy files.

Snapshot of downloading heavy files.

To use the service even the recipient needs to install this application in his computer. You don't need to worry how to tell the recipient to install this application in his computer the software itself tells to the recipient in your sent email.
Share it with your friends and start sending emails with file attachments more than 25MB in Gmail.
Read More
0


Read More
How to Block Unwanted Emails
No need to say that Email Accounts are very important part of our daily life. We use Email Accounts for our Commercial purposes. But what if we someone is irritating us with unwanted mails?? Or he's sending you abusive mails? Or any you are receiving any mails from any company that provides promotional Offers and you aren't interested in them? Well, In this series, I am going to share A Simple trick to block mails from Certain Senders! Now, you can avoid any kind of unwanted mails.

How to Block Unwanted Mails:
For Gmail:
- Login into your Gmail Account.
- Click on the Gears Button present at top right corner and Select Mail Settings from the Dropdown Menu.
- Click on Filters button.
- Click on Create a New Filter.
- In the form field, Enter the Email Address that you want to block from Receiving mails. After that, Click on Create Filter with this Search.

- Now, it will show you various option. In this case, Check on Delete it and Click on Create Filter.
- So, That's all! Later on, you can even unblock the mail, going into filters and deleting the created filter.

For Yahoo:
- Login into your Yahoo Account.
- Click on Options button present at the top and select Mail Options from the dropdown Menu.
- Select Blocked Address from the sidebar.
- Now Enter the Email address in the text field. And Click on + sign to block receiving mails from that Particular Mail.
- For any reason, if you want to unblock that mail in future, then come back in Blocked Addresses field,Select the Mail you want to Unblock and Click on Dustbin Icon.
Now, Easily get rid of unwanted mails using this trick!!!
So, I hope you find this article useful!
Kindly share your views via comments "How to Block Unwanted Emails"!!
Read More
0
Read More
How to Manage Multiple Email Accounts from a Single Gmail Account
Nowadays Email Accounts have became really important for our commercial and professional purposes! Email Accounts always be an important as they have been a source of communication for us! Well, We might be having too many Email Account and it have been too difficult to manage them. Well, No one can deny the contribution of Google as it has given a Great Service known as Gmail. It has wide range of Services and features that enhance user experience. It has a feature to send & receive mails from different Email Addresses from a Single Account. So, Now no need to move from here to there for sending mails and reading them. Now send & receive mails from a Single Account. Well, I have been using too many Email Accounts. But, Now if I need to Send Mails, then I can send them from a Single Account. And even I need to read mails, now it's all possible from a Single Email Account.

How to Manage Multiple Email Accounts from a Single Gmail Account


How to Manage Multiple Email Accounts from a Single Gmail Account
- Login into the Gmail Account that you want to use as your Master Email Account.
- After Logging in, Click on Gears Icon Present at the top right Corner of the page. After that, Select Labs from the dropdown menu.
- Now settings page will appear. Click on Accounts and Import button.
- Now Click on Add a POP3 mail Account you own.
- Enter the Email Address which you would like to use from that particular Master Mail Account. Click on Next Step. Using this Service, you cannot add more then 5 Accounts.
- Now a new window will popup asking you to enter the password. Well, it will also show you username for that Email Account You can even change it if you want. And let all the rest entries remain unchanged. Click on Add Account.
- Now it will ask you that Will you like to send mail from the account you have added from your Master Gmail Account. Well, Click on Yes. As this function will help you to Send mails from the your Master Email and the Additional Account you added both. Click on Next Step.
- Here you can edit the Name of the Account Holder. It's your choice that you want to edit or not.Click on Next Step.
- You need to verify Email Address. As such, Click on Send Verification!!
- To confirm Verification of your Email Address, you need to enter the verification code or the link sent to you in the Mail of the Account which you added.
- After verifying, you are done!! Now you can receive and send mails from that particular Master Email Account. And to send mails, just look at the image below and you will understand. So, when you need to send mail, Compose it, Choose the ID from which you want to send and Send your Mail.
And receiving mails will be a gradual process. You will automatically receive a mail in your Master Email Account if anyone send a Mail to the Account you have added.
So, Was this article useful????
Kindly Share your views via comments on "How to Manage Multiple Email Accounts from a Single Gmail Account"!!
Kindly Share your views via comments on "How to Manage Multiple Email Accounts from a Single Gmail Account"!!
Read More
0
 We use mails to send the things that we know to others , or to send our photos and files to others . But many of them may get many unwanted emails everyday . To delete the unwanted emails , you may be deleting one by one . But today I'm going to tell you a simple method to delete the unread and unwanted emails that you received .It's only for Gmail .
But yahoo mail users may receive more unwanted mails than Gmail. So i recommend you to use gmail or Hotmail rather than rediff and yahoo.
So before deleting your unwanted emails , don't read your mails . Make it as Unread
Steps to Delete all your unread emails (G mail)
After sign in you may able to see a search box like this
 Search " label:unread " without quotes
You may see your all unread mails
Now select all and click delete . That's it now your unread and unwanted emails are deleted!
Please note that before doing this you should read the important mail that you received , because when you delete the unread emails your important emails may also be deleted
Read More
Delete all your unread email (G mail)
But yahoo mail users may receive more unwanted mails than Gmail. So i recommend you to use gmail or Hotmail rather than rediff and yahoo.
So before deleting your unwanted emails , don't read your mails . Make it as Unread
Steps to Delete all your unread emails (G mail)
- Sign in to your gmail account
After sign in you may able to see a search box like this
You may see your all unread mails
Now select all and click delete . That's it now your unread and unwanted emails are deleted!
Please note that before doing this you should read the important mail that you received , because when you delete the unread emails your important emails may also be deleted
Read More
5
 Hii Friends....I hope you all are fine. Today am back with an awesome trick especially for bloggers and webmasters. You must have seen many bloggers around who have mails like admin@theirsite.com. So, I am going to share a trick to get a free domain Email for your Website. For this trick, you must have a Gmail Account and also a paid domain like .com,.in,etc. as free blogging platform domains like blogspot.com are not accepted currently by this method.
Steps to get a free domain Email for your Website:-
I hope my article was useful to you!!!
Please do comments on this post!!
Keep Visiting!!!
Read More
Trick to get Domain Email for your Website for free
Steps to get a free domain Email for your Website:-
- Go to this website- https://www.google.com/a/cpanel/domain/new
- Enter the URL of your website without http://www.
- Now click on Get Started.
- In the next page, it will ask you to fill your personal details.
- After filling,Continue to the next page.
- In the next page, it will ask you to input the username, you can put something like admin,etc. and it will ask you other various entries to fill.
- After filling all the entries,Click on I accept.
- You are almost done!!! Now, you just need to confirm your site's ownership.
- You can choose any of the given methods to confirm site ownership.
And now you can have your own Domain Email for your website!!! Enjoy!!!
I hope my article was useful to you!!!
Please do comments on this post!!
Keep Visiting!!!
Read More
2

Hii friends...I hope you all are fine. As we know that Gmail is the most reliable source to create Email accounts. It had been trying to improve itself day by day. Sometimes we want to use multiple accounts to work upon. Even me had sometimes problems due to this. However, Earlier Gmail does not allowed users to access multiple Email accounts in the same browser simultaneously. So, Gmail launched an awesome feature in it to help users to access multiple accounts in the same browser. This feature is known as Multiple sign-in which is newly introduced by Gmail.
Steps to Access Multiple Gmail Accounts at a time:-


Read More
Trick to Access multiple Gmail Accounts in Same browser

Hii friends...I hope you all are fine. As we know that Gmail is the most reliable source to create Email accounts. It had been trying to improve itself day by day. Sometimes we want to use multiple accounts to work upon. Even me had sometimes problems due to this. However, Earlier Gmail does not allowed users to access multiple Email accounts in the same browser simultaneously. So, Gmail launched an awesome feature in it to help users to access multiple accounts in the same browser. This feature is known as Multiple sign-in which is newly introduced by Gmail.
Steps to Access Multiple Gmail Accounts at a time:-
- Login into your Gmail Account.
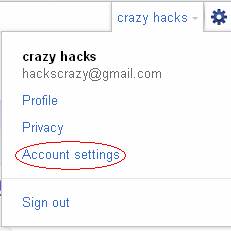
- Select the profile picture button present at the top right corner of your Gmail Account.
- Select Account Settings.
- Now you will be redirected to another page. You will see the Multiple Sign-in option there.It will show it off. So, click on Edit Option.
- Click on Turn on Option and mark all the conditions and save the settings.
- Now you will need to sign out of your Account and again login into it.
- After login in click again on your profile picture button present at the top right corner of your Gmail Account.
Now you will be able to see a new option "Switch Account", Click on it.
- Click on Sign in to Another Account. You can login another account from here.
- From here, you can access multiple accounts of your choice according to your need.
Now you do not need to open several browsers to access different Gmail accounts.
However, you cannot open Blogger or Picasa accounts simultaneously, but you can access your Gmail accounts.
So, I hope you have enjoyed my article!!
Please do comments on this post!!!
Keep Visiting!!!
So, I hope you have enjoyed my article!!
Please do comments on this post!!!
Keep Visiting!!!
Read More
